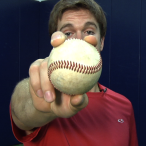
The Proper Way to Field a Ground Ball

November 13, 2012

One of the most popular positions for young ballplayers to play is the infield. It is also one of the most difficult. In order to enhance your skills and play at the next level, you must practice and be mechanically sound. This ProSwing Tip of the Week will focus on a three-step progression that encapsulates the proper way to field a routine ground ball.  We will discuss the three phases of a ground ball, and how to master each one.

Phase 1 – Pre-Pitch to Baseball Ready PositionPre-Pitch Movement
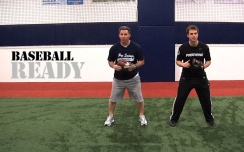
  • Create a Routine – Just like we illustrated in our How to Hit a Baseball videos, we need to establish a Routine and Rhythm as a fielder. A good way to do this is to slightly sway side-to-side as the pitcher starts his windup. As the ball is released and then crosses the hitting zone, you’ll want to transition from swaying side-to-side into a hop that lands you on the balls of your feet with your hands out. This is your Baseball Ready position.
    • NOTE: When a coach says, “Show me a fielding position; do NOT go straight into a fielding position. This is unrealistic and a bad habit that coaches instill in players. Instead, get in your “Baseball Ready” position.
    • Baseball Ready – Remember, we’re tall, on the balls of our feet, and our glove is out in front.

Phase 2 – Baseball Ready Position to Fielding PositionHow to Field a Groundball
  • Attack – Regardless of how hard a ball is hit, we generally teach to attack the baseball. Go towards it. The goal is to reduce the number of hops the baseball will take. This will put YOU in the driver seat and can possibly eliminate a bad hop.
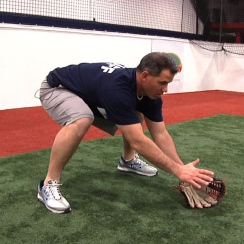
  • Form – As you go down to field the baseball, make sure your chest is up, your butt goes down, and you bend both knees at the same time.
  • Glove Out / Eyes Behind – We want to field the ball with our glove out and inside our glove side leg. Our eyes must be behind the baseball, ensuring that we are not bending at the waist, and we will be able to use our momentum correctly for phase three.
  • Fielding Ground ballsTriangle – When fielding the ball properly, your two feet and your glove should make an equilateral triangle.   
  • Hands at 6 and 2! – We are now deep in our fielding stance with our glove hand at 6 o’clock and our throwing hand at 2 o’clock.
  • FIELD THAT BALL! See it into your glove. Make sure our eyes aren’t on the runner, you must field the ball before you throw a runner out

Phase 3 – Fielding Position to Throwing Position"C" to Power "L"
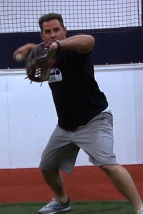
  • NOTE – You must remember that we work from the ground up. We don’t stand straight up from our fielding position, but rather come up as an airplane would as it takes off.
  • Rhythm and Replace – Like a snowball rolling down a hill; we don’t want our momentum to stop from our fielding position.  We want to replace our throwing side foot with our glove, pushing our instep towards our target. As we do this, our arm will separate from our glove and will go back to throw.
  • Glove Side Foot / Power Position – As your momentum continues to go forward and you put your glove side foot down, you should be in our Power Position. (Click here to watch the TopHow to Hold a Baseball Gun Throwing Series Video)
  • NOTE – You should be strong on your front side, with your lead elbow pointing to your target, ensuring accuracy. Chin to front shoulder. Release the baseball with your four-seam grip (Click here to watch the Finding the Seams Video)
  • Don’t Stop the Rhythm – Your rhythm and momentum doesn’t stop on release, in fact; it isn’t complete until you follow through with your throw.

Conclusion

Every year as you get older and play high levels of baseball, the game gets a little faster. Proper mechanics in fielding a ground ball will ensure the quickest and most efficient way to make the play. Remember to perfect your footwork, be consistent with your routine and rhythm, and never stop practicing!


March Madness Contest Giveaway

March 20, 2012

March Madness Contest GiveawayMarch Madness is here! Oh, how sweet it is. You can feel it in the air, warriors on each squad competiting, battling, FIGHTING for that prestegious National Championship. In the spirit of the season, ProSwing is holding a contest givewaway where one LUCKY You-Tuber will win a personally autographed copy of Curtis Granderson’s new book. Curtis “You’re Something Sort of Grandish” Granderson is one of the PREMIERE sluggers on the New York Yankees; and this awesome prize could be yours!

The rules are simple and the prize is GRAND-ish. (Okay, I’m done with the puns for now) Below this post is a YouTube video hosted by ProSwing’s Matty Maher with a fun explanation of what MARCH MADNESS means to ProSwing, and how to WIN this book. Hint: It’s as simple as posting a video response on YouTube! You simply have to tell ProSwing which one of their Instructional YouTube videos is your favorite! With over 150,000 views, you’re bound to like one of them! But enough of this post, check out the video…

Win A Personally Autographed copy of Curtis Granderson’s new book!

The Proper Way to Slide – ProSwing Tip of the Week

February 14, 2012

One of the most important facets in the game of baseball is sliding. A proper slide can be the difference between being safe or called out on a close play. Even more importantly, the purpose of sliding is to prevent injury to ourselves as well as the fielder. The basic idea behind a slide is to continue our momentum as we run towards the base, therefore we must remember to not stutter step into a slide or slow down at all. The proper sliding technique will let us transition from our top speed to a complete stop on the base without shocking the joints or causing any type of harm to our body.

Note: Sit on the ground on your rear with legs outstretched as a starting point for this tutorial.

Sliding – Your Bottom Half

  • Legs – With both legs outstretched straight, you’ll want to tuck one of your legs underneath the other (whatever is more comfortable) so that your foot will rest underneath the knee of your other leg.
  • Your legs should now slightly resemble the number “4”
  • The foot of your outstretched leg should be slightly off the ground with your toes pointed towards the sky.
  • The reason behind this is to not let your cleat catch the ground as you slide and cause you to roll your ankle.

Sliding – Your Upper Half

  • Core – Keep your core tight and supported as you start to go into your slide. You will have a slight lean which is explained below.
  • Arms – Throw your hands up into the air as you start to go into your slide. Do NOT throw your arms and core BACK when you start to slide
    This is a common mistake. I have seen ballplayers hit the back of their helmet on the ground causing that to slow down and sometimes even get hurt.
  • Hands – Always keep your hands up in the air; don’t let your arms drop and your hands drag on the ground.

This is the quickest way to scrape and cut your hands, twist your wrist, or break a finger.

  • Note: You will have a slight lean (this is natural) to the side where your leg is tucked under; make sure to not roll over on your side.

You can accomplish this by keeping your core tight and supported

When to Start Your Slide

  • Start your slide approximately 3-5 feet before the base.

Drill

     – Set up a cone about 4 feet from the base and start your slide from there. Depending on your speed and ability to slide, determine which distance is most comfortable so that you don’t slide past the base or stop too far in front of it.

The Pop-Up Slide

  • Purpose – The Pop-Up Slide provides us with a way to explode back to our feet after our slide and be prepared to take another base if necessary.
  • Mechanics – This takes a good amount of core strength. As you generate the maximum amount of momentum into your slide, use it to thrust your body back to your feet and into the “athletic position”

Drill

     – Have a coach or teammate stand on the other side of a sliding mat or base with their hand outstretched. As you slide, keep in mind that you want to grab their hand at the completion of your slide. As you grab their hand have them yank you to your feet to understand the feeling of the Pop-Up Slide. Keep practicing until you don’t need them!

ADVANCED TIP – SLIDING INTO FIRST

  • Purpose – On a high throw to first, the 1st baseman jumps to catch the ball and tries to tag you on his way back down. This slide provides a way to avoid the tag.
  • Mechanics – This is just like a regular slide, the only difference is you must notice the 1st basemen’s feet before you pull the trigger on the slide. If you see him bend his knees and start to jump up, start sliding approximately 3 -5 feet from the base and slide slightly out towards foul territory and reach for the base with your hand. This will ensure that on a close play he will be unable to tag you.

Conclusion

Sliding is a crucial tool for base runners. The better you can become as a base runner, the more of a threat you are to the other team. Make sure to follow the mechanics I have laid out in this document in order to prevent injury and be SAFE!

FAQS

Q: How do I practice sliding, won’t it hurt?

A: This is a great question, because unlike throwing, hitting, or running; sliding can be abrasive to the body, especially If performed incorrectly. Here at ProSwing we have a “sliding mat” which makes it comfortable to slide while also allowing you to perfect your skill. When you sign up for your next lesson, tell your ProSwing Coach that you want to work on sliding! Every one of our certified staff has extensive knowledge of sliding and can help you. If you are on your own, make sure to wear baseball pants and go to a field where the dirt isn’t extremely dry. If you start to feel bruises or “raspberries” on your sides, your mechanics are incorrect. A proper slide will only leave a dirt stain on your pants!

Q: What about a headfirst slide? That’s what guys in the MLB do!

A: The headfirst slide is also a powerful tool to have as a base runner. It is also a very advanced type of slide with a much greater risk of injury. We will have a ProSwing Tip of the Week pertaining to this slide but I must warn you, it is for advanced baseball players only. The reason that professionals in the MLB perform this slide is because they are professionals in the MLB! While it can grant you better body control, a more targeted reach, and better overall vision, the risk of injury to the fingers, head, and torso are too much for a young athlete to attempt. A slide with your feet first can be just as effective as a headfirst slide, remember that!

How to Throw a Baseball – Top Gun Throwing Series

October 10, 2011

How to Throw a Baseball – Top Gun Throwing Series
(For The Complete Instruction Video on YouTube – click here)  

The ability to properly throw a baseball is one of the first skills a baseball player will attempt to learn. The finer details of throwing can separate the good athletes from the great ones. Factors such as the grip of the baseball in your hand, the rotational arm angle you create, and the release point and follow through are all necessary steps to take in order to make a good throw. As we develop as ballplayers, our mechanics become extremely important; preventing injury, increasing our M.P.H., and defining us as fielders. The Top Gun Throwing Series was designed by the Los Angeles Dodgers and was created to prepare your arm for practice, games, and any other baseball-related activity. This Tip of the Week will give you an inside look at a Professional style warm-up,  correctly warm up all the muscles in your arm, and help increase your arm strength, all while preserving your arm and preventing injury.

The Top Gun Throwing Series is a progression.

Station One – Forearm / Snap of the Wrist

  • Distance – 10 – 12 feet
  • # of throws – 10 – 12
  • Form – Feet are planted firmly on the ground, toes facing your target. Take your glove side arm and hold it out in front of your body, perpendicular to the glove. Take your throwing arm and make a right angle with your elbow resting on top of your glove. Hold the baseball in a four seam grip (Click here to see our “Finding the Seams” Video), and make sure your elbow does not drop below your shoulder. Flick your throwing wrist in a downward motion so the ball rolls off your fingers and towards your target. This triggers the muscles in your forearm; you may feel a slight burn in your muscle, this is normal.

Station Two – Power Position

  • Distance – 5 to 7 feet back from Station One (3 strides)
  • # of throws – 10 to 12
  • Form – After you take your steps back, do not face your partner. You will now turn your body to the right or left (depending on which arm you throw with) so your front hip and shoulder are pointed towards your target. Bend your knees a little, making sure you’re still in an athletic position. Raise your glove side elbow and point it at your target. Think of this as your “aiming device.” With proper mechanics and follow through, pointing your elbow should dictate where your throw will end up. Take your throwing arm, and from your waist, make a large outline of the letter C until your arm is raised at a right angle with your hand pointing out. Hint – If you are wearing a watch on your throwing hand, you should be able to clearly read the time.You are now in a power position.
    • Without stepping or lifting your feet off of the ground, rotate your back hip forward and throw the baseball. Your back foot should pivot into the ground while your front foot should stay planted. (It may slightly open up on the throw, this is okay) Follow through by having your throwing arm finish over your opposite knee.

Station Three – Power Position with Full Follow Through

  • Distance – 5 to 7 feet back from Station One (3 strides)
  • # of throws – 10 to 12
  • Form – This station uses the same concept as Station Two, although we will focus on generating more velocity and power by using a more concentrated and explosive back hip rotation during our throw. Repeat the Steps of Station Two until you are in your power position ready to throw. As you fire your back hip and throw, your back foot should rise off the ground because of the momentum of your throw. You should land with both toes pointing at your target and your feet more or less squared with your shoulders. This signifies a proper follow through.

Station Four – Footwork and Momentum

  • Distance – 5 to 7 feet back from Station One (3 strides)
  • # of throws – 10 to 12
  • Form – The goal of this drill will be to take two steps to get ourselves in our power position. Start with your toes pointing at your partner. Your first step depends on whether you are righty or lefty. Righties will step with their right foot first, while lefties will step with their left foot first. With your first step, make sure to openyour foot (swing it out) as you step, so you can clear your other side with the second step as your front hip and shoulder will end up pointing at your target. As you take your second step, let your front side elbow point at your target as your throwing arm performs the C to power position. If you end up in the same Power Position (with your front hip and shoulder ending pointing to your target) as you did in Station Two, you have performed this correctly.
    • The goal of this station is to create more momentum towards your target; this will in turn generate a stronger back hip rotation and help increase velocity on your throw.
    • Don’t rush through this station. Proper form is key, so your steps and movement should be at about 75% of regular speed.

Station Five – Putting it All Together | One Fluid Motion

  • Distance – 10 to 15 feet back from Station One (5 strides)
  • # of throws – 10 to 12
  • Form – The final station is the culmination of stations two through four. Set up the same way as Station Four, with both feet pointed at your partner. Perform everything the same, but in a more fluid motion. No pausing, no stopping; this is a full throw working on footwork, release, and follow through. This station needs to be performed at game speed.

Cool Down

  • Distance – 20 to 30 feet away from your partner
  • # of throws – 10 to 15
  • How – These are regular throws that we performed in Stations 4 and 5 (two steps, throw, follow-through) except your throws should be at about 75% effort.
    • Less effort doesn’t mean to become lazy on your throws; our mechanics should still be sound, just remember this is the cool down stage.
    • Form – DO NOT GO FROM STATION FIVE TO SITTING DOWN. This station is the most important for arm maintenance and injury prevention. Those five stations will have truly warmed up your arm, but a cool down is necessary before you perform any other baseball activities. These throws should focus on form and be at about 75% effort, giving all the muscles in your arm the necessary cool down they need.

Conclusion

The Top Gun Throwing Series is a Form Throwing Series designed to loosen up your arm and get you ready for games, practice, or any other baseball related drill. It is not a program that is specially designed to just increase velocity, although proper throwing form will allow you to reach your maximum arm strength. Follow these steps correctly, and your arm will be in top shape and ready to perform at 100 percent. Remember that every throw you make should have a purpose. Work on your form, aim for your target, and make sure you’re not aimlessly throwing. Bad habits can form quickly. Be your own coach!

FAQS

Q: I want my athlete to throw harder… how do I increase the M.P.H’s on his fastball?

A: This is an extremely popular question among parents, as the MLB has glorified all pitchers who can throw up that magical three-digit number. The ability to throw with more velocity results from flexibility, arm strength, and proper training. We will have a special advanced tip for our athletes that will lay out a complete Long Toss and Flexibility plan. There are no shortcuts when it comes to throwing “heat,” and if you start with our Top Gun Throwing Series, you’ll have the foundation on which increased velocity and arm strength can grow.


Q: Why is my athlete so inaccurate? Is he throwing the wrong way?

A: Inaccuracy in baseball is a result of poor form and concentration. There are so many variables that go into a throw that it’s hard to make a generalization. Some issues could be the release point, disconnection of the lower half, poor rotation, short-armed mechanics, front side leaking, just to name a few. My best advice is to schedule a personal lesson with a ProSwing Instructor. Our staff is trained to evaluate an athlete’s mechanics and not only determine the problem, but provide the best possible solution that your athlete will easily understand. We then try to create the best muscle memory of the proper mechanics, increasing the success rate your athlete will have.
(For The Complete Instruction Video on YouTube – click here)  

Hitting in a Batting Cage : Improving your Swing

September 15, 2011

Batting Cage tips

A batting cage machine can be an extremely useful tool when it comes to improving your swing. This ProSwing Tip of the Week will help you get the most out of a batting cage or pitching machine. Let’s first examine the difference between standard baseball drills and machine-based drills. Tee work, soft-toss, and overhand batting practice drills, in my opinion, are the best tools to become a better hitter. These allow you to break down each part of your swing, and correct any deficiencies one by one. A batting cage is more of a rapid fire drill, and relies heavily on timing and tracking. That being said, a batting cage or pitching machine can be beneficial in many ways. Unlike the former drills we spoke about, a machine can show some real velocity and get you “game-ready.” When you’re in the batter’s box and it’s you versus the pitcher, they won’t throw their fastball lightly.

There are two general skills that you must focus on when in a batting cage.

These are timing and tracking.

Timing

  • Find the Ball – Depending on whether the machine shoots out the ball, or someone is feeding the ball into the machine, you need to see the baseball’s path before it’s fired out at you. Force your eyes find and follow the ball from the start of its journey all the way to being launched.
  • Get Your Front Foot Down – This is the most important part of hitting off a machine. As we’ve stated in other Tips of the Week, hitting is made up of two components; rhythm and balance. A batting cage machine can severely disrupt your rhythm, balance, and timing if you’re unable to get your foot down in time. Make sure your load and stride don’t occur too late. (Click here for the Anatomy of the Swing video to learn how to load and stride) In the same regard, don’t stride too early and be forced to throw your hands at the pitch.
  • Take A Pitch – Taking a pitch against a machine may sometimes have more value than swinging at one. Focus on your load, your stride; where is your body when the ball crosses the plate? Did your front side leak forward? I hope not!  Remember, we want quality swings, not quantity.

Tracking

  • See the Ball – Once you have your timing down, it’s time to track the baseball. A batting cage machine will have more velocity than soft toss or batting practice, so let’s train your eyes. Try to see the ball from the release of the machine all the way to the back of the cage. Most batting cages will throw strikes down the middle, so this is a great opportunity to track and recognize that this is a pitch you want to hit. That way when you see that pitch in a game you won’t let it go!
  • Take a Pitch | Part 2 – I’m sure you’re confused as to why you’re using a machine and I’m telling you to not swing! With tracking, it’s beneficial to see a few pitches all the way through.


Putting it All Together

  • One Fluid Motion – We’ve worked on our timing and we’ve tracked a few pitches. Our front foot is getting down at the perfect time, we’re tracking the ball with our eyes, and we’re ready to hit. As we take our swings in the cage, we want to stay as fluid and smooth as possible. Let’s eliminate any jerking or quick movements that can come with timing a machine, and try to take our most natural swings in the cage.
  •  X Marks the Spot – When hitting in a batting cage, you want your hits to stay off of the side and top nets. These signify foul balls and pop outs, respectively. Your goal in a batting cage is to hit the ball back up the middle, or hit the left or right gap.

Let’s Play a Game

  • No Friends, No Problem – Want to have a little competition? Put a coin in the machine and get ready. Take ten swings and monitor your progress; see how many line drives you can hit against the back net. Remember your score; then try to beat it with your next ten swings.

Conclusion

Hopping into a batting cage, cranking the machine up to 100m.p.h. and closing your eyes while you swing out of your shoes is not the best way to improve your swing. Many young athletes I know love to test their skill by putting a coin in the machine and hitting the fastest speed. This can severely disrupt your timing, change your bat path, and give you a plethora of bad habits. You CAN make yourself a better hitting in the cage, just make sure you follow the tips I’ve laid out for you. With proper use, a batting cage machine can improve your swing and better prepare you in game situations against real pitchers.

FAQS

Q : My athlete does personal lessons frequently. When is the best time to use the batting cage machines? Before he goes for his lesson, after, or both?

A: A truly great question. There are two ways to look at this: Hitting before a lesson can be beneficial for recognizing certain deficiencies in your athlete’s swing. For instance, if your athlete is getting under every pitch and popping up, it’s good to recognize that and work on it right away with your instructor when it’s time for your lesson. Using a batting cage machine after your lesson is great because you can put everything you worked on in your lesson to the test. While baseball lessons will generally use front toss, tees, and batting practice as methods of training, a batting cage machine is a great litmus test to see if your athlete can put their swing together against some real velocity.  My final answer would be that a batting cage machine should be used in addition to a personal baseball lesson! Sometimes before and sometimes after.

New York Yankees Coach Kevin Long Gives Baseball Instruction in Port Chester

April 20, 2011

After a solid 5-2 victory over the Texas Rangers, most New York Yankees would go home after a hard day’s work; except Kevin Long. Long, the Yankees hitting coach, left Yankee stadium and came straight to ProSwing of Port Chester, where a select group of forty athletes would receive personal instruction from him.

Promoting his new book Cage Rat, Kevin Long decided to practice what he preached. During his three-hour clinic, Long personally evaluated each athlete’s swing, and then took them aside to talk about their mechanics and approach at the plate. “He really helped me with my swing,” said fifteen-year-old ProSwing Pride player Garrett Longhurst. “I saw him helping A-Rod and Jeter during the day on TV, it was awesome that he was helping me tonight.”

Dan Gray, co-owner of ProSwing Athletic Training Center and former Los Angeles Dodger player was excited to bring the high-profile event to Port Chester.  Says Gray;    “It’s an honor to have Kevin come to ProSwing, he’s arguably the best hitting coach in the major leagues. This opportunity to bring such high-caliber coach and instruction to our athletes is just fantastic.  I think this event highlights the quality of instruction we at ProSwing are committed to providing kids of all ages and levels.”

The Great American Baseball Company along with ProSwing of Port Chester teamed up to bring Kevin Long to ProSwing for this exclusive event. ProSwing boasts approximately 25,000 square feet of space, making it the largest indoor baseball and softball training facility in Westchester.  With locations in Mount Kisco and now Port Chester, ProSwing brings a philosophy that Gray went on to add “ emphasizes confidence building along with acquiring skills that prepare players for success in meeting challenges in baseball and in life. “

The clinic took place from 7:00p.m. – 10:00p.m. this past Saturday (April 16th, 2011)

ProSwing of Port Chester is located at 36 Midland Avenue in Port Chester, NY.

Measuring Success…How John Wooden Influenced ProSwing’s Personal Lessons

June 17, 2010

“Success comes from knowing that you did your best to become the best that you are capable of becoming.” – John Wooden

John Wooden is considered one of the greatest, if not the greatest coach of all time. His achievements and accolades are unbelievable and are almost impossible to surpass. In his 27 years of coaching UCLA basketball, he never once had a losing season. He led his team to 10 National Titles and compiled a winning streak of 88 consecutive games. Yet it was his character and leadership that will resonate in the minds of every sports fan, teacher, and athlete. John Wooden wasn’t just a coach, he was a teacher. He wasn’t just a leader, he was a role model. John Wooden was a giant among men. Perhaps his greatest trait, was his ability to individualize his teaching to players, enabling them to become the best that they are capable of becoming. The quote at the beginning encompasses the true meaning of success. This was one of Wooden’s best maxims, and can be carried over into athletics, education, and every aspect of our lives. John Wooden taught us how to teach, and he has an enormous influence in the way we give our personal lessons here at ProSwing.

ProSwing has a great mission statement, a beautifully written paragraph about what we do and why we do it. If you asked any one of employees what our “Mission Statement” is, they may or may not be able to recite it back to you verbatim. If you ask what our “Mission” is, the answer will be synonymous. “We are here to educate and inspire.”  Much like John Wooden’s techniques, we don’t aim to simply instruct, we aim to motivate our athletes to leave our facility better than they were when they walked in. We make our athletes mentally and physically stronger, and most importantly, more confident. “Success” for a ProSwing athlete isn’t measured by whether or not you become an MLB draft pick or a perennial MVP, it is measured in how you made yourself better. A better baseball player. A better teammate. A better person.

There is no “standardized” lesson at ProSwing. We don’t adhere to a corporate set of regulations and drills that must be achieved in our 45 minutes of instruction. Our lessons are individualized, engaging, and aimed to educate our athletes with a necessary skill set, and at the same time inspire them to become better. Let me give you a personal example.

I have two athletes that I teach here at ProSwing that physically, mentally, and talent-wise couldn’t be any more different. However, their level of success that they have achieved is identical. One is a seven-year-old boy named Zach, an energetic and eager young ball-player who just loves to put on a glove and play. He’ll squeeze the bat deep in his hands and ask for “just one more pitch!” every single week. The other is a 20 year old Division I ball-player named Ray, who can run a 6.5 second 60 yard dash and most likely will get drafted by the MLB in a couple years. Now while my drills and specificity of instruction may differ, my approach to both of my students is the same. For Zach, I may focus on having a strong fielding position and the proper footwork as he throws to first. With Ray, we’ll work on seeing a curve-ball out of the pitcher’s hand and getting the front foot down so he doesn’t leak his front side and alter his contact point. Either way, after Zach’s 50-foot throw or Ray’s swing at an 85 M.P.H. slider, I’ll always ask them how they feel. What was going through your mind? Did you notice a difference in the correct footwork? Did you feel your body leaking forward? All of our instructors don’t “tell,” we “teach.” A lot of the time we are simply teaching our ball-players how to learn. I know the talent levels of both Zach and Ray, meaning I know what both of these athletes are capable of. I know they are both capable of becoming better than they ever thought they were. Our goal as instructors is to ignite the passion within our athletes to want to become the best they can. Once they do, we’re right by their side, ready to take them to the next level.

John Wooden didn’t coach all-stars. Sure, he had Kareem-Abdul Jabbar and Bill Walton, but many of his players weren’t the greatest in the country. There have been many players that have went to UCLA after Wooden’s tenor that far surpassed the talent level of the former National Championship teams, yet never won a championship themselves. Wooden, however, knew how to get the best out of every player he had. He knew how to inspire them and taught them how to succeed, whether that meant Walton scoring forty points in a game, or the 13th man on the bench coming in to play defense for 10 seconds.

Zach, who started as a five year old who didn’t know which hand to throw with, is now one of the best players in his little league.  Zach has succeeded tremendously. It wasn’t because of the drills I made him do or how many pitches I threw to him, it was because Zach wanted to become better. He was inspired and hungry to learn, and took advantage of every minute we had together. Will Ray get drafted and play Major League Baseball? Maybe he will, maybe he won’t. That’s not how ProSwing would ever measure Ray’s success. Ray succeeded when he learned all his strengths and weaknesses, and let us help him enhance his strengths and overcome his weaknesses. If John Wooden was ever able meet or work with Zach or Ray, I think that he would believe they have succeeded.

John Wooden spent 29 years of his life as a coach, aiming to educate and inspire his players. In his passing, we remember all the great achievements and accolades he has received, but most importantly, we carry with us his teachings and beliefs. It is the latter that will live on forever.

5 Great Tips to Prepare for Your Upcoming Baseball Season

March 31, 2010

It’s that time of year again, the snow has melted, the sun is out, and baseball is once again in the air. It’s time to burst into the closet, grab all your equipment and race down to the field. Here are five crucial tips for your upcoming baseball season, no matter what level you are!

  1. Stay rested – It’s not opinion, it’s a fact: baseball is a mental sport. The best way to stay fresh mentally and physically is to get your eight hours of sleep. Studies have shown that in certain cases, subjects that didn’t get their recommended eight hours had a reaction time that was slowed down approximately 1.2 seconds.  That’s a pretty powerful stat, considering you have less than a second to make a decision in the batter’s box on whether to swing or not.
  2. Stay focused – Whether it’s day one of the season, or your final game, keep focused on every at-bat, every pitch, and every play. In the field, always think, “What do I do if the ball is hit to me?” When you’re at bat, stay focused on the pitcher, pick up his tendencies. If you’re on the mound, stay consistent with your delivery, and remember; the most effective pitch is STRIKE ONE.
  3. Practice, Practice, Practice – The greatest hitters in the game, Pujols, A-Rod, Derek Jeter, all continue to work on their swing. There’s no such thing as your “final” swing, when you never have to practice ever again, and you can deem yourself “perfect.” Practicing to hone your skills in the field, at the plate, or on the mound, is absolutely essential to succeed. “Preparation Breeds Confidence.”
  4. Stretch – I know what you’re thinking, how did stretching make it into the top five?! I could easily bump this up to number one, because stretching is the best way to prevent injury. When it comes to baseball seasons, they can be very, very long. The only way to ensure an entire season of play is to stay healthy. The best way to stay healthy is to always warm up, and stretch out all your muscles. So before you grab that ball and rev it up to 90 m.p.h., stretch a little bit!
  5. Believe in yourself – While baseball is a team sport, when you step up to the plate or onto the mound, the only person who can help you is YOU. Trust your stuff. Believe you can get a hit, throw the right pitch, and succeed! “If you think you can, or think you can’t, you’re right.”

Most importantly, have fun! Good luck to all our athletes playing this spring!

2006 World Series Champion John Rodriguez Joins the ProSwing Team

February 3, 2010

While Major League Teams are scurrying to prepare for spring training, the ProSwing Athletic Training Center made one of the best acquisitions of the off-season. They picked up John Rodriguez, 2006 World Series Champion and 13-year professional baseball player. The contract that Rodriguez signed was a little different than his other baseball contracts; instead of signing to play, he signed to teach.

John Rodriguez was drafted in 1995 by to the San Diego Padres. A New York native, he played eight years of minor league ball with the New York Yankees organization before moving to the St. Louis Cardinals. It was in 2006 that he won the World Series with the Cardinals. He returned to the Yankees in 2009. He has since decided not to return for the 2010 season, and instead, become a full-time instructor at ProSwing.

“Rodriguez’s wealth of knowledge and experience make him a perfect candidate to educate and inspire all of our young ball players,” ProSwing owner Dan Gray said.  “We are proud to have a player with John’s accomplishments associated with our new facility,” added co-owner Barry Perlow. ProSwing, which recently opened its brand new, 25,000 square foot facility in Port Chester, will now have Rodriguez on their roster of instructors. With locations in Mount Kisco and now Port Chester, ProSwing has helped to train many of this region’s athletes over the last eight years.

“I am really excited to be a part of ProSwing,” Rodriguez said. “I always wanted to share my knowledge and develop young athletes, and now ProSwing has given me that opportunity.”

ProSwing of Port Chester is located at 36 Midland Avenue. To schedule a lesson or for more information call 914-937-6700 or visit the website, http://www.proswingbaseball.com

Baseball is Back in Port Chester, NY

November 9, 2009

Announcing the Opening of ProSwing of Port Chester 

ProSwing Baseball and Softball Training Center has opened its second location, a 25,000 square foot baseball, softball and athletic training facility. Owner, Dan Gray, played professional baseball with the Los Angeles Dodgers organization and opened ProSwing in Mt. Kisco, NY in 2002. Partner, Barry Perlow, has been an owner of Soundview Sports in Purchase, NY since 1995. General Manager, Ian Church, played 5 years of professional baseball, most recently in the St. Louis Cardinals organization. 

Instruction at ProSwing is offered for boys and girls ages 3 and up. There are also programs for college players and adults. According to Dan Gray, “Our goal is to give the highest level of instruction with a simple approach by which all players, of every skill level, can learn and understand the degree of discipline and dedication necessary to excel on the field.” 

ProSwing programs include after school clinics, mini-slugger sessions, team camps, small group and private lessons, coaches clinics, birthday parties, and holiday and vacation week programs. Emphasis is on pitching, hitting, fielding and strength and conditioning training. There are similar programs dedicated to Soccer.

 The facility includes an infield, batting tunnels and pitching mounds for softball, little league, modified and high school and college players. There is a multi-purpose field and a section for strength, speed and agility training for an emphasis on sport specific endurance building and injury prevention techniques, boot camps and personal training sessions.

 ProSwing of Port Chester, Athletic Training Facility is located at 36 Midland Avenue, Port Chester, NY 10573. See the virtual tour on YouTube.com (search ProSwing Port Chester).

  For further information call 914-937-6700 or check the website at http://www.proswingbaseball.com.